


Let's start with the basics:
1. The Colorless Blender (CB) is not really a blender. The name of this marker is misleading because it doesn't really blend colors together. It re-wets the dye on your paper so you can push colors around to lighten areas, add highlights or fix mistakes. Good to know, right? So stop trying to blend your colors with the CB because it's not going to work!
2. The effects from the CB are on "time delay". What I mean is, it takes a couple of seconds for the dye to react with the blender solution and for you to see the effect. It's best to work slowly, adding just a little bit of blender at a time. Wait a moment to see the effect take place, and add more if you need to. If you continue to add and add blender without pausing to see the results, you will probably oversaturate your page and not have the effect you were looking for. Remember, less is more with the CB.
3. You can color over dark colors or light colors with your CB and the color will not permanently transfer to your marker tip. If you have colored over a dark color and see that color on your marker tip, simply color a few strokes on some scrap paper until the CB solution runs clear again. It's important to clean off the tip of your CB before you put it away. If you leave dark color on the tip, put the cap on and leave it for awhile, it is possible to permanently stain the tip and your CB will no longer be colorless!
Now that the basics are out of the way, what are some fun things you can do with the CB?
1. Add a Textured Look!
One of my favorite things to do with the CB is to add the look of texture. Take this adorable "Itchy Dog" image from Bugaboo. Look at how I colored his itchy sweater. Looks okay, right?

But when I add some strokes of the CB, it makes the sweater look textured and more interesting.
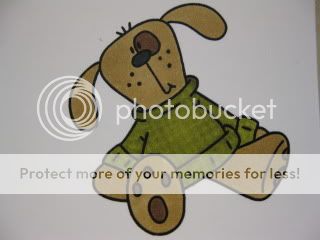
I created this look by lightly drawing straight lines down and across the sweater with the CB to make the pattern. Again, I did this very lightly and I was almost all the way across the sweater with the up and down lines before the effects started to show. Keep a picture in your mind of what you are trying to do and follow that, the CB effect will follow shortly after!
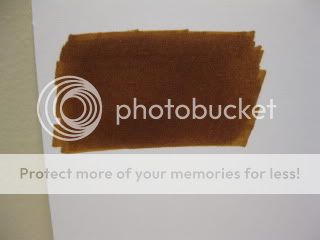
If you have scraps of textured fabric or denim, you can wet them with the CB and press it onto your colored area and the texture from the fabric will transfer to your image. Give it a try, you'll be amazed!
2. Make Something Look Transparent:
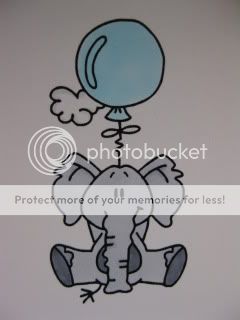
Another fun thing to do with the CB is to color transparent things, like balloons. Here's another super cute Bugaboo image, from the Critter Balloons line this is "Elephant". Here I colored the image without using the CB:
And here's how I colored it, using the colorless blender. This is easier to do with lighter colors but it can be done with bolder colors with a little practice. First, I colored in the center of the balloon with the colored marker.

Then I took the CB and colored in circles from the center out. This pushes the color out towards the edge of the balloon to create a transparent look. That's why you don't want to color all the way to the edges with the colored marker. Since we know the CB will be pushing the color out, if you get too close to the edges, you run the risk of pushing your color right out of the lines.
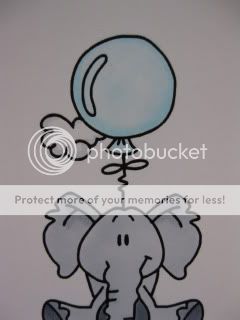
In person, it's much easier to see the transparent effect. This technique requires some practice to get a feel for how much CB to apply to middle without pushing the color out of your lines. Stick with it though and you'll get it! Then you can go get the whole line of Critter Balloons from Bugaboo and have fun coloring your balloons.
3. Make Patterns:
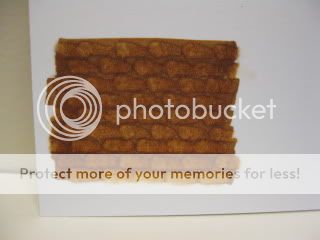
You can also use the CB to make a pattern on an area that you've already colored. For example, you can create the look of bricks by using the chisel tip of the CB on a dry colored area. Hold the angled side down for a few seconds on the colored area. Lift and repeat in whatever type of brick pattern you want. Here I colored on scrap paper with E37:
You can also use the brush end to make polka dots on a dry colored area. Press straight down and hold. The longer you hold, the bigger the dot will be so again, experiment to see what works for you. Remember that these effects are achieved by coloring on DRY areas. If your ink isn't dry and you try this, you're going to end up with a blobby mess.
4. Make Something Look Furry:
I color a lot of bears and other animals and one thing I discovered is that if I swirl around the CB on my bear, it looks like it's furry. You can also use what the Copics people call the "nasty rag" technique which is when you color a section of a terrycloth rag with the CB and press it on to your colored area. The texture of the rag adds a furry look to your image. You can do this with any colors, it doesn't have to be the CB. I prefer to just swirl the CB on my image to create the furry look. I feel like I have more control that way than with the "nasty rag" but give both ways a try and see what works for you. Here's how I colored the adorable "Teddy Roses" image from Bugaboo without using the CB:

He's cute, right? But if I want to add just a little more interest or appearance of texture/furriness to him. I take the CB and swirl around very lightly. The ink doesn't have to be completely dry for this technique.

Don't be afraid of your Colorless Blender. It really is an amazing tool that with a little practice can add a lot to your coloring. I hope you've found this tutorial helpful and that it has inspired you to try new things with your CB!
I'd love to hear from you so if you try any of these techniques, let me know what you think. If you have your own tips or tricks, leave a comment, I'd love to hear them!
I'd love to hear from you so if you try any of these techniques, let me know what you think. If you have your own tips or tricks, leave a comment, I'd love to hear them!


Thank you for a great tutorial....haven't tried all your techniques so can't wait to try. I really appreciated you writing this all down...know it took a while.
ReplyDeleteThis is very helpful, thank you! I've bookmarked it for future reference. ;-)
ReplyDeleteThis is an excellent tutorial and explanation about the colorless blender. I've taken two Copics classes and you've explained it better than anyone. I use my CB a lot to "erase" out of the line movements, but have accidentally tried some of the techniques you listed here; had no idea that's how to make a bear furry - it just happened. With your help, I can make my transparent balloons with feeling I just goofed up. I love the texture technique - will definitely be trying these! TFS!
ReplyDeleteThis is great!!! I love reading your blog and seeing your marvelous cards. You rock, girlie!
ReplyDeleteWhat a great tutorial Lori ! I can take my blender out of its box now ! Thank you very very much ! Smiles from Catherine
ReplyDeleteGreat tutorial thank you very much. :-) xx
ReplyDeleteLori, after reading this unbelievably amazing tutorial, I want you to know that I want to have your babies. . .;) This is a simply smashing tutorial - My sincerest thanks! :D MWAH!
ReplyDeleteLori,
ReplyDeleteThank you so much for the great tutorial! I was coloring up the Bugaboo Bears (they are so adorable I had to buy the whole set!) and came online to get a few ideas from the design team when I found your tutorial.
I am now happy to report that I have some fuzzy bears and love the tips on using the CB to add texture. I had to try out some of the other tips and absolutely love them. I had only used my CB to move color back into the lines and now will be using it so much more.
Thanks again for sharing these tips. Jodie picked a great team of designers!
Thanks,
~Andrea
These are some fantastic ideas!! Thank you Lori!
ReplyDeleteWOW! Awesome tutorial! So helpful. I always wondered how the CB should be used. Thanks
ReplyDeleteGreat information, I have made many messes with my CB this will surely help. Thank you
ReplyDeleteThis is great Lori!! Thanks so much!!!! I have a CB on my wish list.
ReplyDeleteDeanne :)